Safe Routes To Schools Activities and Resources
Safe Routes to School at Home
The Safe Routes to School team made this curriculum for you to use at the pace you’ve set in your house, hence the lack of dates. This supplemental material will keep your child moving and learning and start to give them some more sense of independence. We have NUMBER sections with subsections in each. Feel free to do all of the subsections in one section in one day, or back-to-back days, or once a week, or once every other week. It’s whatever will help your schedule flow better. There are videos and links to online resources scattered throughout this document.
At the bottom, we’ve included links to websites and Facebook pages for as many PE teachers as we could. Enjoy!
Pedestrian Safety Education
Using a crosswalk
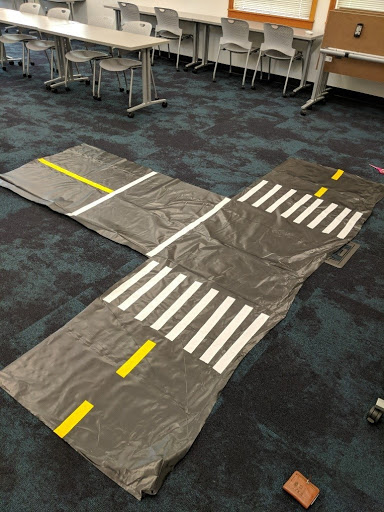
Set up a crosswalk however you see fit. We got a little intense with the crosswalks we took into schools and made them out of plastic drop cloths and duct tape. You could do the same with black garbage bags and masking tape, tape right on the floor, string lined up on the carpet, hallways as they are, or a strategically mowed lawn. Make it as big as you can so your child can get an idea of what a crosswalk feels like to cross the whole thing by themselves while they have to pay attention to everything going on around them.
Before they touch the street, see what they can identify; the road (where the cars go), sidewalks (or shoulders) (where the people go), bike lanes, crosswalks (different kinds), intersections, curbs, driveways, traffic signs and signals (for pedestrians too).
Define pedestrian
Pedestrian: anyone using the road who is not in a motor vehicle or on a bike (or vehicle that belongs in the bike lane).
We use the Pedestrian Toolbox to work through the ways to cross safely. Ask your child what they have on their body to help keep them safe. Point to that body part on yourself if they need help.
Eyes: What are we looking for? Vehicles, signs, other pedestrians, bicyclists, lights on cars, people sitting in parked cars (are they going to move?), eye-contact with drivers, etc. Make sure you are looking, and not just shaking your head. Use your whole head to look, not just shifting your eyes.
Ears: Language of cars; sirens, slowing and accelerating engines, friendly and unfriendly horns, beeps, no headphones, listen to adults walking with you, talking signals, etc.
Brain: Stay focused, think before moving your feet. Take in all of the information you gathered with your eyes and ears and translate that before you let your feet do anything.
Feet: Walk, don’t run. Walk with purpose. Don’t play around, especially in the middle of the crosswalk. Communicate with your feet and where you stand when you are getting ready to cross (stand away from the corner if you are not going to cross and vice versa, playing feet do not communicate preparing to walk).
We use a little rhyme (see video here) to help kids remember how to keep themselves safe while crossing the street. Have them repeat after you until they can say it with you, then let them say it by themselves.
Stop every time at the edge of the street | Plant both feet and hold your hand up to show “stop”
Use your head before your feet | Point to your head and then to your feet
Make sure you hear every sound | Cup your hands around your ears and move your head side to side
Look left, look right, look allllll around. | Point left, then right, then swivel your head all around
Let them practice crossing on your mini street a few times on their own. You can even have fun with them and pretend to be a car driving down the street and see if they notice you.
Next time you go for a walk (regardless of whether you are in the middle of town or 20 miles outside of Glendale) look for opportunities to point out signs, elements of the street, and let them practice crossing the street on their own.
This curriculum is good for all ages, but is generally introduced in schools in K-2.
Video alternative:
This video comes with a quiz and links to other resources for teaching walking. There are videos for ages 5-9, 10-14, and 15-18.
Practice walking to school (or another common location)
Pick a point that you would want your child to walk to regularly, like school, a store, or a neighbor’s house and go for a walk. Make it a point to walk to that place and show them how easy it is. Point out each crosswalk/crossing point and things to observe. Review the crosswalk safety and remind them to focus on their surroundings, not playing around. Consider timing the walk so you know how long it should take them when they do it alone (whether that’s tomorrow or three years from now) so they leave on time when they need to be somewhere and for your own knowledge. Teach them to look out for other people on the road and use whatever you use for “stranger danger.”
Below are suggestions for walking distances for each grade level. These will vary based on each child. You decide what is best for your child, these are just general ideas of what we have seen since teaching crosswalk safety and leading walking groups.
K-1 – Generally 1/2-3/4 of a mile is plenty of walking.
2-3 – 3/4-1 mile is a good distance.
4-5 – 1-1.5 miles is a good distance for walking or biking. It gives freedom with boundaries.


